Hi everyone,
In my previous post: http://missdynamicscrm.blogspot.com/2020/05/customize-and-extend-dynamics-marketing-event-portal-part-2-deal-with-standard-fields.html
we have learned how to
customize and modify the Portal Source Code and inject some logic inside, this
enables you to extend the basic functionality into you or your customer’s unique
requirements.
We have also learned about the
“Allow Anonymous Registration” field and its impact in the standard Portal.
** you can refer to my
previous blog: http://missdynamicscrm.blogspot.com/2020/05/Dynamics-365-Understand-theimpact-of-AllowAnonymousRegistration-field.html
This field allows you to
control whether everyone without signing in can or cannot register your event.
However, some customers may have
requirements to just filter out and hide the “Private Events” instead of asking
users to sign in since we already had a standard flag. With this, public users
will not even able to see and aware that there are such events.
Now, let’s start our development.
Back to your code again.
We have learned how the Portal
source code structure is and which part has to modify.
All available events are
basically showing all upcoming event which has been published with LIVE status
in your Dynamics Marketing, this never excludes anything regardless on which
login you are using without further customization.
Just to share with you, the
function that is being called is actuallty this function:
Then if we go deep again, we
found this function (inside event.d365.service.ts) that is calling API ../published
I have checked, at least for
now that I am aware of, there is no way to modify the /published API from UI.
So, you can just use old style
method that is backend customization through programming by utilizing a field.
In this example and actually
for your real project, you can just use “Allow Anonymous Registration” or “Event
Type” or “Format” field.
Let’s code!
When we understand correctly,
actually the event list is managed by a variable that is located in the home.component.html,
that is “allEvents”
It means the part of the code
that we need to change is only this part:
We have learned how to use ngIf
previously in my previous post:
It is all about angular.js and
type script but if you are already familiar with javascript or C# or Java, and
ASP.NET with MVC concept, this will not be difficult for you to learn. P.S. I
mentioned before, I have no experience in Angular and typescript before too.
The key is this highlighted
part:
*ngFor="let event of
allEvents"
This part is to loop every
event of allEvents object

Now, just change your code to:

<div *ngIf="allEvents" class="container mt-5" id="all-events">
<div class="row">
<div *ngFor="let event of allEvents">
<div *ngIf="event.allowAnonymousRegistrations" class="col-12 col-md-6 col-lg-4" attr.data-href="/event?id={{ event.readableEventId }}">
<div class="card mx-auto mb-4" style="width: 18rem;">
<div class="card-body">
<h5 class="card-title">
<a [routerLink]="['/event']" [queryParams]="{id: event.readableEventId}" title="{{ event.eventName }}" [attr.aria-label]="getAreaLabel(event)">
{{ event.eventName }}</a>
</h5>
<h6 *ngIf="event.building" class="card-subtitle mb-2 text-dark">at {{ event.building.name }} </h6>
<span>Allow Anonymous Registration: </span>
<!--
<span *ngIf="event.allowAnonymousRegistrations; else showFalse" class="card-subtitle mb-2 text-dark">{{ event.allowAnonymousRegistrations }} </span>
<ng-template #showFalse>
<span>false</span>
</ng-template>
-- change to-->
<span> {{ getAllowAnonymousRegistrationLabel(event) }}</span>
</div>
<div class="card-footer text-dark" >
{{ getDateString(event) }}
</div>
</div>
</div>
</div>
</div>
</div>
Let’s see the result!
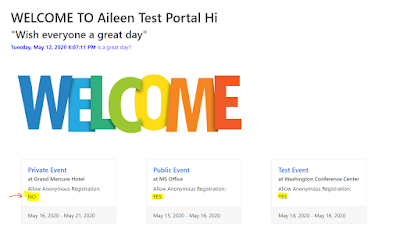
*Before
*After:
Now you as public user can only
view 2 event which are NOT a Private event.

**Of course you can use other
fields or other logic to adjust to your requirements.
In my previous
post, we have learned how to modify the code and add some logic that can be
done through viewer (HTML) or its typescript code.
The same case here, I have tried the
same method and it works.
So, instead of manipulating the UI
with adding another DIV and put in ngif in the inner DIV, I can use code to
control.
I revert back the UI code to its
original state and commented my changes.

Now, go to the .ts file, this is
the key:

As you know that allEvents is a collection
or array of list of event, so you can definitely filter out the available
events by filtering allEvents based on “Allow Anonymous Registration” field.
So, I have added new line below the
this.allEvents = events; and comment it first
Result before changes:

You can still see 3 events, now uncomment the filter.
private loadPublishedEvents() {
this.isLoading = true;
this.eventService.getPublishedEvents().subscribe(
events => {
this.allEvents = events;
this.allEvents = events.filter(evt => evt.allowAnonymousRegistrations);
this.isLoading = false;
},
(error: LocalizableError) => this.handleErrorResponse(error)
);
}
This is the result

After finished the steps, you managed to learn how to filter, show, and
hide the events based on logic you implemented.
Hope this can help you to
understand how to control your Portal, not only Events but other things, what
to display and what to hide, and manage the messages or UI that public will
see.
You can either modify the UI/viewer
or the code.
Thank you!


