Sunday, 24 August 2014

Show Field as Group By or Axis X (Horizontal/ Category Axis) from Another Related Entity in CRM 2011/2013 Charts

A brief post, I don’t know whether you have known about this trick, but I just realized that this is possible.
Well, at one occasion, I had a demo to prospect and they want to see the Chart Capabilities in CRM 2013, especially to show Cases based on the Customer Location (can be City, State, or Country).

The problem is, currently, the charts (out of the box charts) are only supporting to display chart with Axis X or Group By from the same entity fields.

image

For example,
  • Case by Case Origin
  • Case by Create On
  • Case by Owner
  • Case by Priority
  • Case by Case Stage
  • Case by Case Type
  • Case by Contract
  • Case by Created By, and
  • Case by Customer, and so on
The maximum level that can be possible is Case by Customer.

How about if I want to show Case by Customer Location (by City, by State, or by Country) or to show Case by Contract Expired Date.

I though it is impossible without modifying the XML and I don’t want to show that because the audiences are definitely from Business Users and non-developers.

Then, I was thinking that I have to create 3 custom fields in Case entity, which I will auto-populate using Workflow every time create Cases from Customer.

But, what if the Address from Customer is changed, then I have to create another custom business process to Update those 3 fields in the related case record.

Finally, I found a solution which I didn’t expect before and it is so easy.

So, first of all, you need to create a new view or modify the existing view.
And.. Then, add the Column from the related Entity, in this case I want to show Case by Customer Location, then I add columns from Account:
  1. City
  2. State
  3. Country
image

image

Then, I save this view.

Without publishing, you can can go back to the Case Charts.

Once you go back to the Case Charts then create a new Chart, you can see those 3 new fields (from Account – a related entity) were added and were available to be selected as the Horizontal Axis (Axis-X)

Yess..Bump..Now you can see...
Those fields are available as Category Axis that you can use..

image

Then, I am be able to show Chart, Case by Customer City, State, or Country.

image

image

image

I don’t know now whether you have known about this trick, but I just found it without any expectation before. Smile
*No coding, no XML modification :)

Hope this helps!

Thank you.

Sunday, 17 August 2014

Uninstall Microsoft Dynamics CRM Rollup

Many people and my ex colleagues were asking me how to uninstall CRM Rollup, so in this post I give the steps how to uninstall the CRM Rollup.

1. Go to Control Panel

2. Go to Program and Features

3. Click the View Installed Updates

uninstall rollup

4. Find the Microsoft Dynamics CRM Server 2011 or 2013

5. You can see the installed Rollup that you can Uninstall.

*But, please be aware that not all of the rollup or service pack can be uninstalled, you should be aware by seeing the detail information provided by Microsoft in the MSDN articles before installing the rollup to avoid the risks before it becomes a disastrous plan.

Please watch out the Removal Procedure

For example:

It is possible to uninstall the Rollup 12
image

But, not for Rollup 5.

image

You also can search to another expert blog to find out whether CRM Rollup is possible to be uninstalled or not, for example this blog from Ben Hosk:


So, please, everyone, be careful before you do the rollup installation or turn off your automatic updates download if you think that your company or server environment is not ready to install the new rollup because it will result to fundamental changes that might not be able to be rolled back.

Especially, for those who have reports or apps or integration points accessing direct database or unsupported customization in CRM, this thing should be an important info for you.

Hope this helps!
Thanks.

Converting WhatsApp Message to Case in CRM 2013

First of all by writing this post, I also want to celebrate the Independence Day of my Country. I would like to say Happy 69th Birthday to my Nation, Indonesia, even though, now I and you are in long-distance relationship Smile, but my heart is always for you!

Okay, let’s continue to my post…

I was preparing the demo for my pre-sales activity and I was thinking how to ‘integrate’ a famous messenger application to CRM. As we know that WhatsApp is one of the most reliable communication application to connect everyone by using their smartphones and only using internet or data plan.

Many Salesperson or Insurance Agent are using smartphone everyone and they might communicate with their customers anytime and anywhere, so they will use WhatsApp for a better and an easier way since WhatsApp supports image transfer as well. Customers can send their information, such as location with the image as well, for example they need a towing service when they were stuck at the road or they want to submit a claim, then they will send the image of the policy and the car appearance, including the newest condition of the broken car as well. They usually often contact the Agent, not directly call the Customer Service. Then the insurance agent can easily collect the required information that might be needed by the related department. It is so easy for them.

So, it made me to keep thinking how to convert the WhatsApp Message between Customer and the Salesperson or Agent to CRM Case.

Luckily, Microsoft Dynamics CRM 2013 SP1 and Microsoft Dynamics CRM 2013 Online with Springwave Update have the capability to Convert Email to Case. So, I have an idea to utility that feature.

And yes, I check the WhatsApp feature, and it can send the Conversation as email, so I think my idea and my research here will work, just need to finish a fine tuning.

So, first of all, I will complete the setup of an Incoming Email, I am using Email Router and I create a Queue with that email. Make sure it works first.

SNAGHTMLe7741ff

Then, I will create an Email to Case Creation Rule with the help of that newly created Queue.

SNAGHTMLe77aa8c

Well, now I want to have a new Origin of Case, I add new Type: from WhatsApp

And thanks for my friend, @RajYRaman, because I have an idea that it is possible to add New Case Origin with the beautiful logo as the icon after I read his tweet :).

Please refer to this post:

to get detail how to add new Case Origin and Add the icon as well.
So..Now what….I don’t have time to create new Apps in Android nor integration tool or Web Service to connect them…

Okay, actually, they’ve already had their methods of friendship, yes, this is Email…

Then, I learned how the ‘Email Conversation’ feature in WhatsApp works and with what kind of format. And it is actually has structured format for Subject and Body and also the Attachment.

After that, I create a workflow to update the origin to WhatsApp with certain rules:

image

and Update the Origin to WhatsApp

image

*I just use the default format of WhatsApp email and simple rules for my demo, if your client has complicated SOP, then you should write your own plugin to convert to what they expected.

*You also can have dedicated queue for WhatsApp to create a separated email, for example:
cs-whastapp@example.com

Then…it is the time to check out and test the result.

I am playing role as Customer, I send message through WhatsApp to my Agent.
And now…

I am the Agent, I can send the Conversation through email.

image

I also can send the Picture as well.

image

I send the email with default format and nothing to change.

image

And Send it…..

And I log in to CRM..And I get the Case:

image

Then, you can the Email and Attachment of this case as well:

image

The conversation is stored in the .txt file

SNAGHTMLeabd895

And of course, you can get the image as well, it can be broken car or new car for new application.

image

And the Voice Recording File as well.

image

SO…the User can hear the message and do the next action or escalation.

Yes, the customer can send the images of their broken car or new car for new insurance application and say message to the agent as well.

*If you need more complicated scenario, you might need a plugin to convert your own rules to the case.

For example, this case need to tie to the correct customer, then you can use the title:
WhatsApp Chat with +6012…

You can use the number to indicate the customer number and get the Customer Id using custom Plugin

And if you want to convert the .txt to another format, you also need a plugin to do it, this is the prototype to convert WhatsApp Message to a New Case in CRM 2011 by utilizing WhatsApp and CRM 2013.

Hope this helps!
Thanks.

Add WhatsApp and Other Source as New ‘Case Origin’ with Custom Icon in CRM 2013

In my post, I was adding WhatsApp message as the new Case Source, so in this post, for those who still need further explanation how to add WhatsApp as new Case Origin, I will explain how to add WhatsApp as new Case Origin.

*FYI, this is not only to add the WhatsApp, it also can add other case origin as many as your company needs it.

First of all, please read this excellent blog:
http://msdn.microsoft.com/en-us/library/dn660975.aspx

and this link also for Spanish version:
http://www.comunidadcrm.com/demianrasko/2014/07/17/iconos-de-orgenes-de-casos/

Okay, now here we go.

1. Open the Customization

2. Go to Case entity

3. Go to ‘Case Origin’ field

4. Edit the field:

image

5. Add new Item, add the Label and Value

image

*Please remember your given value for this new Case Origin.

6. Save and Close and Publish it.

7. Go to Web Resources section.

8. Create a new Web Resource with type = .PNG

You can download the WhatsApp image 16x16 from here (you can choose):

WhatsApp16x16_black
WhatsApp16x16_green1
WhatsApp16x16_green2

*16x16 Only :)

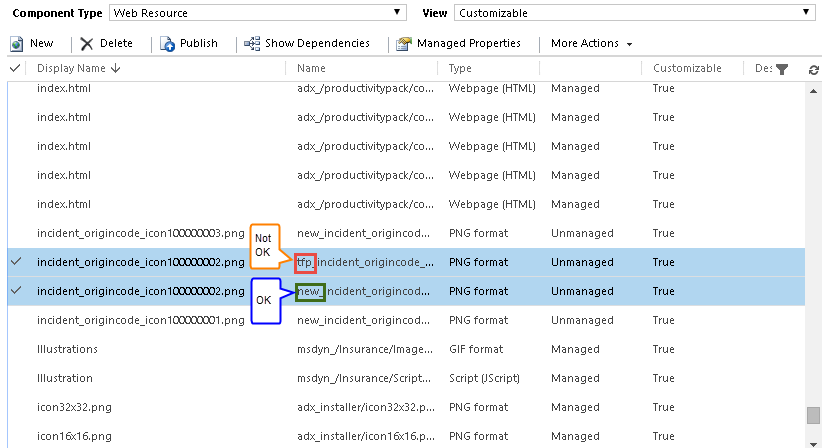
9. Give the name with format: Incident_origincode_iconxxxxxxxxx.png

with the xxxxxxxxx is the given value for the new origin code.

For example:

Incident_origincode_icon100000000.png
or Incident_origincode_icon100000002.png

*Please be aware that on the website there is a typo,
it was typed:‘Incident_orgincode_icon#.png’
The correct one: ‘Incident_origincode_icon#.png’

*This is so important, otherwise, you will not get what you expected..

image

If you don't change it, it will not work.

image

*Remember you give the value at the step #5, but without comma.

*And so far I tried using different prefix other than new_ and it did not work, so I recommend you to use prefix new_

Don't use another prefix.

Save and Publish It.

10. Create a new Case with Origin = ‘WhatsApp’ and see the result in the Case View.

image

*If you choose the Green Color as your icon

image

*Another green icon.

image

If you don't create new custom icon, then it will give Yammer Iconfor the new Custom Case Origin.

Please refer to my other post to convert WhatsApp message to a Case in CRM 2013.
Check my Post!

Since it is also applicable for another case origin, so you can use the same method to add other case origin, such as Skype, YM, etc, just see this colorful icon.


Or you just want to have a gray, black, and white color, it is up to you :)

*Just down use another icon size, it is very recommended to have 16x16, if you still use another size, then it will give you a very unstructured view.


Hope this helps!

Thanks.

Friday, 25 July 2014

Displaying Files or Documents List in Microsoft Dynamics CRM 2011/2013 Dashboard

As a consultant, we will face many clients with their various and unique requirements as well.

Now, they want to upload the files into CRM, then the Management can download the files after they log in to CRM. This circumstance, I’ve experienced before, when customer wants the Dealer after log in to the system can download the files uploaded by Marketing Team, for example, new pricing guide FY 2014, events list, promotion buy 1 get 1 gadget, membership upgrading, new model launching, and many more.

For example, every week or every month for each branch, they create Report using Excel, then they want the Management to see the periodic reports after log in to CRM on the one of the CRM Dashboards. They just go to the Dashboard, then double click and download the files. They don’t integrate CRM with SharePoint, so is that possible to let the users attach documents and download the documents as well? I found this requirement also in the forum.

So, as far as attachment is concerned, I always think to utilize Notes, but… Notes entity is too common and not too specific, and we cannot place Note to the Dashboard, I could not find in the View List that can be added to Dashboard as well. Well..you can still use IFrame. Okay, but I was considering to use Reports.

So, now, my choice…I was doing research to utilize Reports in this case.

So, here are my steps:

1. Create a new Category for Reports:

*For example: Weekly Report

image

You can refer to this link: 

This category is so important for grouping purposes and it makes your reports in manageable structure.

2. Create a new View for Reports:

image

Don’t’ forget to tidy your form, by editing the Filter Criteria

image

 and doing Configure Sorting

image

You can add Columns as well.
Save it and Publish it.

3. Go to the Reports, and Select the View (new View)

Then click “Of Current View”

image

This steps is purposely to get the View Link

SNAGHTMLca24728

With Format:


4. Then, just get the characters inside angle brackets <>


This will be your IFrame URL

5. Go to Customization and Create a New Dashboard

Inset an IFrame Component:

image

Then set the URL and uncheck the checkbox in Security section

SNAGHTMLca77ae2

Increase the Height and Width as well to prettify your Dashboard..

SNAGHTMLca8e204

Save it and Publish it

6. You also can use View List as well

*You will know the difference between using IFrame or View/List View

- For the IFrame, I give name ’Weekly Reports Dashboard’
- Then, for List, I give name ‘Reports Dashboard

image

Set Properties screen:

image

Click Set...

image

Save and Publish All Customizations.

7. Go to the Report and add the Reports

image

Don’t forget to set ‘Categories’ and ‘Display In’ based on your Criteria you’ve set for your View.

You also can attach or upload images, .PDF, .txt, and .rar as well.

image

8. Go to the Dashboard and see the result:

*Weekly Report Dashboard (IFrame)

image

*Reports Dashboard (List View)

image

9. Download the Reports

Now, let’s do testing the result for this user requirement’s solution

*Report Dashboard (List View)

When you do double click, it will Run the Report immediately.

SNAGHTMLcb36abb

So that, to download this Report, user should go to the View from Dashboard:

image

Then it will open the View

SNAGHTMLcb5a886

And by doing double click action on the file link it will automatically download the file

image

*Weekly Report Dashboard (IFrame)

Since it will directly open the view, then the user just needs to do double click:

image

10. You can upload files through the Reports and the other users can download the files.

This is what we can do if they want to upload and download reports or files or documents from CRM, especially, can access from Dashboard.