Microsoft has launched the Microsoft Dynamics CRM Sample Social Care Application together with some new entities that they are purposely created for the Social Live and Connection, during the launching of the Microsoft Dynamics CRM Springwave ‘14 Updates. As we know that the entities, such as Social Profile entity is only accessible by using CRM API, it is different from the standard entity.
To download the sample Application, you can go to this link:
http://www.microsoft.com/en-us/download/details.aspx?id=43122
Well, actually to run this new Sample Application is not easy, I tried several times to get it works and I found this is not easy, even in the my former company, for the demo, I was developing from scratch to my former manager to demo to ensure the prospects that CRM is a social-able apps that can connect to any social media, that is I thought it was easier, but, well, I want to try this tool since it is free and of course a nice tool..
Okay, get back to the topic, these are step by step to run the Social Care Application.
Let’s get started.
1. For the starting step, you should and you should really read the ‘Readme’ document under the Social Care folder upon you download the App.

2. Please notice the Prerequisites section first.
Just remember this is not stated in the Prerequisite, that this is only for Microsoft Dynamics CRM with Springwave update, either CRM Online or CRM OnPremise with SP1 installed.
3. You should have Visual Studio 2012/2013 installed to run this Apps.
4. Then, you should connect to the SQL Server Database
5. Just follow the instructions first.
6. You will open the Visual Studio Solution

7. Read again the Prerequisites, to build the Project, you should have all of the required assembly references, including TweetSharp, Hammock, and Microsoft.WindowsAzure.ActiveDirectory.Authentication

So, you should install the Nuget Package
Nuget Package

Go to Tool –> Package –> Manager Console, and type the following commands:
· PM> Install-Package TweetSharp
· PM> Install-Package Hammock
· PM> Install-Package Microsoft.WindowsAzure.ActiveDirectory.Authentication
Register your CRM app in Windows Azure for CRM Online!
8. If you are using the CRM Online version, you should use the OAuth authentication, and again, take a note to this line:
· If you’re using OAuth authentication, perform the necessary configuration steps as per
Register a CRM app with Active Directory
Yes, you should register a CRM app with AD through Windows Azure. You can register with free of charge for trial.
*Additional info:
In order to register your app, you might be requested to input the redirectURI.
You can refer to this link:
http://msdn.microsoft.com/en-us/library/dn531010.aspx?cs-save-lang=1&cs-lang=csharp#bkmk_redirect
You should debug your app to get this redirectURI:
string redirectUrl = WebAuthenticationBroker.GetCurrentApplicationCallbackUri().ToString();
Previously, we could register using:
https://graphexplorer.cloudapp.net
But, now the method has been changed according to this link:
http://msdn.microsoft.com/en-us/library/dn481567.aspx
Otherwise, if you are using CRM OnPremise version, so you do not need this. So just watch out about this prerequisite, you might be able to run the Social Care Apps and get the social feeds that you want to, but, you cannot pass the information to CRM.
All about Twitter Development
9. Well, to help you more understand about the next prerequisite:

“Twitter application registration. You must register an application in Twitter so that OAuth against Twitter can be used from the sample app.”
I write the detailed steps,
- You should go to Twitter Dev and App Registration (you should have the Twitter ID, of course!)
https://dev.twitter.com/
or the shortcut:
https://apps.twitter.com/
- Then, if you have no existing App, then you can create a New App, otherwise you can use your existing one.
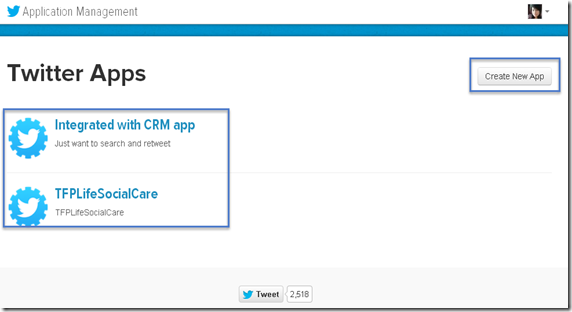
- Get your Keys and make sure your Access Level:
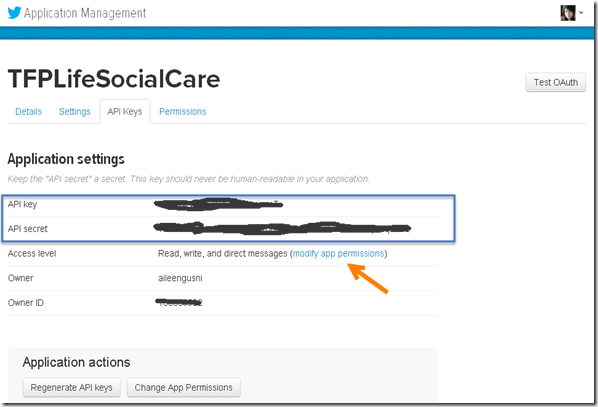
and

- Copy paste to Notepad first, you will be really need them.
CRM Queue Setup
10. Just follow this instruction:
“On your Microsoft Dynamics CRM server, create a queue with “social to case settings” configured and activate the queue.”
- Go to Microsoft Dynamics CRM server
- Go to Settings –> Service Management –> Queue
- Create a New Queue with Social to Case Settings

- Set the Social to Case Settings

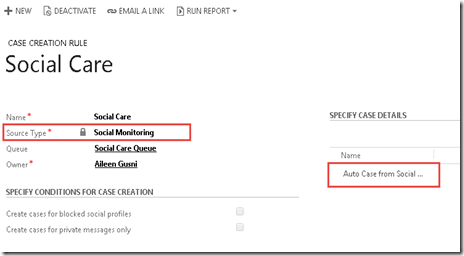
- And do not forget to Activate the Rule.
 Database Setup
11. Just follow these instructions:
1. In Visual Studio, navigate to View > Server Explorer.
2. Right-click Data Connections, click Add Connection, select Microsoft SQL Server (SqlClient) as the data source, and then click Continue.
3. Specify the server name, enter Twitter as the database name, and then click OK.
4. To create the necessary tables, run the Models\Twitter.edmx.sql file provided with the sample from SQL Management Studio. This will update your Twitter database.
5. Update the following connection strings in Web.config accordingly.
<connectionStrings>
<add name="TwitterEntities1" connectionString="…" providerName="System.Data.EntityClient" />
</connectionStrings>
Twitter Connection Setup
12. Just follow the instructions, by editing the Web.config:
1. The sample application needs the consumer and secret keys to communicate with Twitter. You can obtain the keys by registering your app on Twitter. More information: Twitter Apps
2. Once you have the keys, update the Web.config file with the keys under the application settings section. The settings are “ConsumerKey” and “ConsumerSecret”.
You did the Twitter registration in Step 9.
Microsoft Dynamics CRM Setup
13. Just follow the instructions, just edit the Web.config, set the value based on your environment.
1. Open the Web.config file and change the app settings as indicated here.
· Fill in the value for the “CrmServerUrl” setting to point to your server (don’t add the trailing slash mark ‘/’).
· Set the value for “DeploymentType” to Online, IFD or OnPremise as per your Microsoft Dynamics CRM installation.
· For an IFD:
o Specify a value for “OAuthUrl”
o Specify a value for “ClientID”
· For an Online deployment:
o Specify a value for “ClientID”
· For an on-premises deployment:
o Specify a value for “UserName”
o Specify a value for “Password”
o Specify a value for “Domain”
2. (Optional) Configure the watch list feature. The watch list button in the app UI searches for recent messages from Twitter for the specified search term. The “WatchlistKeyword” setting controls the search term.
Build the Sample
14. Build the Solution as usual, if you have any error during the building run, then you should check the assemblies and Web.config.
15. Then, you can Run the Sample.
16. You also can customize the Code based on what do you want.
17. I will be back by writing the next part post about Running the Sample Social Case Application in Microsoft Dynamics CRM 2013
Well, a lot of setting and configuration steps to make it works. Nice tool but it was not easy job to get it worked.
Continue to Part 2?
Click here --> Redirect me to Part 2
Hope it helps!
Thank you.


